Friday, February 10, 2012

Homemade Laudry Soap

Happy Friday!! This Friday Fun day is about homemade laundry soap. Here are the great reasons to make your own soap:
1. Your child has sensitive skin. It's amazing how many children have sensitive skin
2. You are sick of paying so much for detergent that's environmentally friendly and has not chemicals in it
3. You have 15 extra minuets on your hands (because that's all it takes)

Alright.. to make this, you need to buy 3 ingredients :

Borax (can be found at Target)
 Fels - Naptha (walmart carries this) You need 2 bars of this
 Washing SODA. (target also carries this)
Alright.. here's the recipe:

2 cups Fels Naptha Soap (finely grated)
1 cup Washing Soda
1 cup Borax
  • Mix well and store in an airtight plastic container.
  • Use 2 tablespoons per full load.
I've found that 2 cups Fels Naptha is about 1.5 bars. You can save the other half of the bar for another batch.. or you can use it as a stain remover. It's AMAZING. It gets out every kind of stain imaginable. You just scrub it on the stain.
This recipe costs you .01 per load!! Seriously. And you'll probably make one batch every 4-6 months depending on your family size.

I love it, it's super easy, eco-friendly, sensitive-skin friendly, and budget friendly.


Thursday, February 9, 2012

Little Scientist

We LOVE science projects here. Killian is patiently waiting for me to finish his science kit that I've been promising since Christmas.

But here's a simple, fun science activity that you can do at home. And I almost guarantee that you have all the equipment:
 1. A bowl
2. scissors
3. A pencil
4. Coffee filter
5. A jar
6. A paper clip
7. Food coloring
1. First cut the filter into strips. I drew lines and let killian cut.. because that's a preschool skill (to cut a straight line) and hey! Perfect motivated time to practice

2. Mix 2 colors in the bowl (we did blue and yellow and red and blue... red + blue worked better)
3. Dip the strip into the color

4. Wrap the strip around the pencil and paper clip it. Fill the jar with water. Put the strip in so that only the bottom is in water.

6. Watch what happens. The colors will separate.  One color on top, one on bottom and the mixed color in the middle. SO FUN! Purple worked better.. you could see the blue on top. Green you could see the yellow on bottom but not the blue on top.
Here are the best pictures I could get:


Questions to ask:
Will the top part wash away? Why or why not?
Why are there different colors on the strip?
What color will ___ + ___ make?

Have fun!!! Your little one will LOVE this.

Wednesday, February 8, 2012

Egg cartons- A multi-tool

YES... this post is about egg cartons. And yes, there are more ways of using egg cartons than just holding your eggs. So here are my ways:


1. Paint... it holds paint AWESOME! I cut out strips of them (say we have 4 colors, I cut out four). Easy to clean up and perfect for paint brushes.

 This one happens to hold puffy paint.. just waiting to be painted onto a penguin.

The lids are great as a pallet.. especially if you're into mixing paints to discover colors. I cut this into 2 so we could use it for 2 children.


2. Another way to use it is a counting game. I used a sharpie to write numbers on the sides of the cups. Then, I gave my son cheerios, raisins, M&M (those disappeared faster than anything) and he had to put the right number of snacks in each cup (I started at 10-22 because he knows how to count to 10). You can start with 1-10 though as well. Lots and fun.. and then they eat up the mess afterwards! Keep the egg carton for another time.

3. Faux Goggles. I took two cups (attached across from each other) and cut them away from the other 10. Cut a small hole in the bottom of both, and punch a hole of the sides. String a string through and tie them off like goggles.

As a cute lesson about owls: Owls can't move their eyes! Have your child try on these glasses and put something in their peripheral vision. They can't see it without turning their heads. They'll probably want to try it multiple times with the goggles on and off to figure it completely out.

I know there are TONS more ways to use egg cartons.. these are just a few :) So save those egg cartons and recycle them once you're finished having fun!

Tuesday, February 7, 2012

Problem and Solution: Finding Time to Clean

This is one that I had on stephandkillian.blogspot.com but it's one that I still use every week.. and  I love it!


I've decided to add something new to my blog... something for other moms (or dads) out there, that find themselves extraordinarily busy. AND possibly for moms and dads who aren't busy. At least once a week until June, I'm going to post a problem and solution that I've come up with. And, ok, the title is a little cocky. I'm not promising that my solution is actually the  best solution. But I'm promising that it works for my family, and it's the best that I've found after researching and trying out other solutions. 


So, here we go. Problem and Solution #1, finding time to clean:

Problem: I find that during the semester, when I'm in school 20 hours a week, working 10-15 hours a week, taking care of a 2 year old the other hours, AND doing homework 10 hours a week.... that my cooking and cleaning fall by the wayside. The house becomes a MESS, and then I spend 5 hours on a weekend cleaning the whole thing. I never want company to come over, and I feel disorganized the whole week until it's clean. (And let's face it, with a 2 year old and two NAUGHTY dogs, it stays clean for about a half hour after the little one wakes up the next morning).

Solution: The absolute BEST solution I've found, is breaking the cleaning up into small jobs, and assigning a day of the week. I have a cleaning schedule that is posted weekly in my kitchen. I cross things off each day as they get cleaned. And I have to say... my house is actually staying clean! Here's a photo of this week's cleaning schedule:

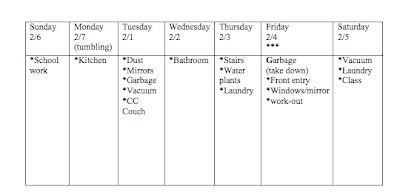
I add little notes to myself in the margins as you can see, and the duties sometimes change positions depending on the week and the days I'll be more or less busy. Yes, once and a while I don't do the cleaning for a day (such as this week, Killian decided to boycott sleep last night until 10 pm, at which point I was too exhausted to clean, so the cleaning for Tuesday got done today, on Wednesday), but I still always do the jobs the next day. I found that crossing them off helps alot, because I can visually see what still needs to be done. While I'm waiting for pasta to cook, I might quickly take out the garbage or dust. That way, I can do the jobs during spare min. throughout the day, without having to mentally figure out what needs to be cleaned. 

Finally, I came up with a nice little rule in our house to keep it PICKED UP (one of the major battles for any parent). The rule is:
*If toys are in the playroom or Killian's bedroom, they can lay out all day. If they are in a room Mommy walks in (aka, any other room), they must be put away RIGHT after they are finished playing with. Both the playroom and Killian's room must be picked up before bed* 
I leave an extra 15 min. before bedtime to clean up. Eventually I think Killian will wise up and pick up his toys as he goes, so he doesn't have to get ready for bed so early. The rule's been working out pretty well too. I don't mind toys being all over the floor as long as I don't have to step over them, or look at them. It also helps that all the toys are only in Killian' room and the playroom with the exception of the kitchen set and the train table.

So, that's my solution for cleaning. All the jobs divided up throughout the week, and having them hanging up so I can see them. I've been using this tool for about 4 months now and I have to say that it's working so well that when I'm lazy and don't print off a new one (again like this week, I waited until Monday when I normally print one off on Sunday), I get frazzled not seeing my cleaning schedule up on the kitchen cabinet.

Monday, February 6, 2012

An Outfit for a princess

I recently babysat for a friends ADORABLE 7 month old, and I got baby girl fever... which I haven't had since I was pregnant and didn't know what sex I was having (can you say 4 years ago?) Anyway... I was out shopping at my favorite goodwill store, and I ran across these pieces of clothing:


I picked up this cute shirt to go under the whole outfit. I was originally going to cut off the arms and sew them into the yellow onesie, but this shirt is too cute.. so I left it. 


SOOOO adorable.. and all name brand! But I wanted to make it a little more personal. So here's what I did:

I drew a design to match the vest on some freezer paper:

 Then I used my handy dandy x-acto knife and cut the design out:
 I ironed the design to the pants:
 Using fabric paint, I painted the design on. After it'd dried, I added some white as an accent:
 And it was complete!
 I think the outfit is super adorable! I can't wait to see it on :)

Friday, February 3, 2012

Rocket Ship Room

This fun Friday, I thought that I'd show you Killian's new rocket ship/space room. It's super cute and was pretty easy to make.. 
I took the Dinosaur quilt off of his green quilt. (With stitch remover it only took me about 10-15 min.) He was VERY sad, and now uses the little toddler quilt as a blankie.
But I sewed a rocket ship from 3 pieces of fabric I purchased. Very quick and easy. This time around , I didn't use pins or iron-on adhesive. I simply zig-zag stitched around. I'm pleasantly surprised by how well it turned out :)
Here's a close up of the rocket ship:
 After everything was sewn on, I used 3-d fabric paint to write his name.
 I cut out the letters for BLAST OFF, and again just sewed them on. I knew I didn't care if they weren't perfectly straight, because blasting off is messy (or so I assume). Finally, I made a planet and sewed it on. It took me about 1.5 hours total between cutting and sewing. 

I'm planning on a rocket shaped pillow, but that's a future project.

I bought  these big letters from Hobby Lobby for 1.50 each. I also got some green ribbon. I drilled 2 holes in each letter with my drill. Then painted them with acrylic paint. I strung the ribbon threw, nailed nails to the wall, and hung them up!

 For the curtains, I found a curtain at goodwill for 2.99. It was very large, so I cut it in half, hemmed it, and tied each side off with blue ribbon. The wall stickers were bought off of Amazon, along with the hanging planets. I also got glow in the dark star stickers off of Amazon.
These little hanging robots/planets were bought on clearance at a local store. They're eeboo in case you like them. The moon I got on clearance at Walmart after Christmas. 

Finally, the picture. This was bought half off at Hobby Lobby. It was the most expensive purchase of the room ($35.00), but I knew that it'd cost me that much in time to paint it myself. 

OHHH yes.... the hat hangers. I bought the wooden background at hobby lobby- 1.50 each. Then I bought a packet of wooden knobs. I painted the knobs, and screwed them into the astronauts/planets. 

The whole room probably cost about $75.00! Very nice for a rocket ship room that my little man loves!!!

And, the cutest thing of all.... Killian was a planet for halloween- Jupiter to be exact. I made his costume:

I LOVE reusing things... so now it's a beanbag chair in his room :) Super cute- fits the theme, and has a purpose :) And Killian told me that it's very comfy. 

Thursday, February 2, 2012

Ice Cube Color Fun

It's winter.. so why not enjoy some COLD color fun?

Here is the toddler idea for the week:

Fill ice cube trays full of water, and put different food coloring in the cubes. Once they freeze, the fun can begin!!

Either (for little ones) simply use the ice cubes as "cold crayons" and color with them- You may want to wear mittens :)

Or you can do some science with it:

Put a color in a bowl and discuss the color with your child. (Example: blue)
Then put a drop of another primary color on top of the ice cube (example red) Watch what happens!!

Your child will be very excited to see it change to purple. He/she will want to test out other colors. You could make a chart as you go:

Blue + Red = purple
Blue + Yellow = Green

This is TONS of fun!

Sorry I don't have any pictures at this time- but  you'll have to trust me that it's loads of fun :)

PS you may need to wear a smock or dirty clothes as the ice cubes melt and the color does stain.

Wednesday, February 1, 2012

Organizing Your Crafts

Oh WOW! I can't believe I've lived with my craft items jammed into buckets for so long! I couldn't even take a picture of how they looked before; I am too ashamed! Here's how the buckets looked, and you can picture them all stacked on top of each other haphazardly in the closet:
I decided to clean and organize them all. So now they're in different containers:

1. Fabric scraps- This I organized by fabric, rolled them into long rolls, and used clear elastic rubber bands to secure them. It worked really nice. I can sort through the fabric easily, and more importantly, I can see what I have!!
2. Fabric paints- I used one of Killian's shoe boxes to store these. It works great! The shoe box is small enough that it actually fit into another container that wasn't completely full!
3. Felt Scraps- I use these for various crafts. I took out any small pieces and kept only the big ones.
4. Cross Stitching- I stuck all of the embroidery floss into a bag. This will be helpful, because I often use embroidery floss for my clothes as well.
5. Old Clothes- Instead of throwing stained or ripped beyond repair clothes away, I kept putting them in a pile. Now they're in their own bin. :)
6. Clothes for Up-Cycling- these are cute things that I've found that I KNOW I want to work with- or already have an idea for. These too now have a space.
 
7. Extras- Another little shoe box worked well as a catch all- Sewing Scissors, Bag of buttons, bag of thread, etc.

Now it's all stacked nicely and I know EXACTLY where everything goes. It took me about 45 min. to organize it all- and it was well worth it.